If your Dell Precision 3590 is running out of power too quickly, shutting down suddenly, or refusing to charge, it may be time to replace the internal battery. This step-by-step guide walks you through the entire journey: recognizing battery problems, confirming that the battery is really at fault, choosing the correct replacement (42Wh JTG7N or 54Wh DR02P), and safely installing the new battery yourself.
- Common signs your Dell Precision 3590 battery needs replacement
- How to confirm it is really a battery problem
- Choosing the right replacement battery (42Wh vs 54Wh)
- Preparation: tools, data backup, and safety
- How to enter Dell Service Mode safely
- Removing the old battery in your Precision 3590
- Installing the new JTG7N or DR02P battery
- First startup, BIOS check, and battery calibration
- FAQ: common questions about Dell Precision 3590 battery replacement
Recommended replacement batteries for Dell Precision 3590
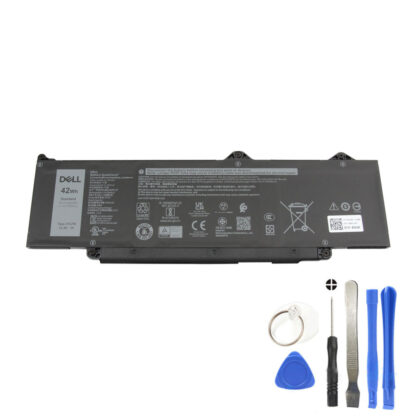
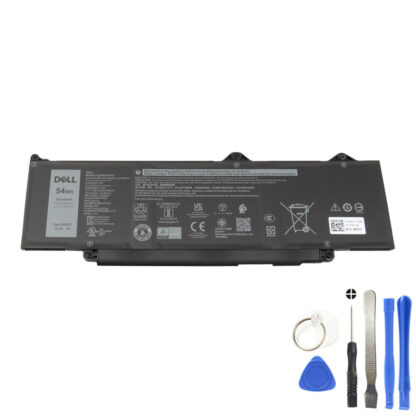
Check the label on your original battery (JTG7N 42Wh or DR02P 54Wh) and match it with the correct replacement above before you begin the installation.
1. Common signs your Dell Precision 3590 battery needs replacement
From a customer’s point of view, the battery problem usually starts with feelings like “my laptop doesn’t last as long as it used to” or “it just turns off for no reason.” Before you invest in a new battery, it helps to understand the most common warning signs.
| Symptom | What you experience | What it usually means |
|---|---|---|
| Rapid battery drain | Battery goes from 100% to under 20% in less than 1–2 hours of normal office use. | Battery cells have aged and lost capacity, common after 2–4 years of use. |
| Unexpected shutdowns | The laptop powers off suddenly when it still shows 20–40% battery remaining. | Battery can no longer supply stable voltage; protection circuits may cut power. |
| “Plugged in, not charging” | Windows reports that the AC adapter is connected, but the battery percentage does not increase. | Often a worn battery, but can also be caused by AC adapter issues, charging circuit problems, or outdated firmware. |
| Battery level stuck at a fixed percentage | Battery stays at 0%, 1%, or 79% and never really moves up or down. | Battery controller cannot correctly report capacity anymore, often due to internal wear. |
| Battery health warning in BIOS or Dell utilities | Dell diagnostics or BIOS reports “Battery health: Poor / Very bad / Replace.” | Dell’s own tools judge that the battery is near the end of its life. |
| Laptop only works on AC power | The Precision 3590 shuts down instantly if the charger is unplugged. | Battery is no longer able to power the system at all and must be replaced. |
| Physical swelling or deformation | Bottom cover may bulge; touchpad feels raised; you may feel extra pressure when closing the lid. | Dangerous battery swelling. Stop using the battery immediately and replace it as soon as possible. |
If you notice one or more of the symptoms above, especially sudden shutdowns, poor health reports, or swelling, your Dell Precision 3590 battery is very likely at the end of its life and replacement is strongly recommended.
2. How to confirm it is really a battery problem
Before ordering a new JTG7N or DR02P battery, confirm that the battery is the main issue and not the power adapter or the system board.
- Check with another power outlet and adapter if possible
Plug your Precision 3590 into a known-good wall outlet. If you have access to another compatible Dell power adapter, test it. If the laptop charges normally with the second adapter, your original adapter may be faulty rather than the battery. - Run Dell diagnostics from BIOS
Restart your laptop and press F12 repeatedly at startup, then choose the diagnostics option (if available). Let the built-in hardware test run. Pay special attention to any messages about battery health or charging. - Check battery status in BIOS
Enter BIOS/UEFI (usually by pressing F2 at startup). Look for a “Battery Information” or “Power” section. If it reports poor or failed battery health, you have strong confirmation that replacement is needed. - Observe behavior while on AC and on battery
With the AC adapter connected, your laptop should run stably. If it shuts down or restarts even while plugged in, there could be a motherboard or power circuit issue. If it only misbehaves when running on battery, the battery is the most likely cause.
Once you are confident that the battery is the problem, you are ready to choose the right replacement and plan the installation.
3. Choosing the right replacement battery (42Wh JTG7N vs 54Wh DR02P)
The Dell Precision 3590 typically uses one of two internal batteries:
- 42Wh battery – part number JTG7N
- 54Wh battery – part number DR02P
To avoid compatibility issues, remove the bottom cover (or check your old service report) and read the part number printed on the battery label. Match it to one of these:
- If your original battery is labeled JTG7N 42Wh, choose the 42Wh replacement battery.
- If your original battery is labeled DR02P 54Wh, choose the 54Wh replacement battery.
Using the correct part number ensures proper fit, screw alignment, and battery reporting in BIOS and Windows.
4. Preparation: tools, data backup, and safety
Replacing the battery in a Dell Precision 3590 is a straightforward procedure for most users with basic technical skills, but you should prepare properly. Treat this as working inside a professional tool: calm, careful, and step by step.
4.1 Recommended tools and environment
| Item | Description |
|---|---|
| Small Phillips screwdriver | For removing base cover and battery screws (M2x4 captive screws). |
| Plastic pry tool or guitar pick | Helps to gently release plastic clips of the base cover without scratching the case. |
| Anti-static wrist strap (recommended) | Reduces the risk of electrostatic discharge (ESD) damaging internal components. |
| Small container for screws | Keeps screws organized so nothing is lost during the procedure. |
| Clean, well-lit workspace | A flat, non-conductive surface with good lighting helps you see connectors and cables clearly. |
4.2 Before working inside your computer
- Save your work
Save and close all open files and applications. - Shut down Windows
In Windows, click Start > Power > Shut down. Wait until the laptop is fully off (no lights, no fan noise). - Disconnect all cables and accessories
Unplug the AC adapter from the electrical outlet and from the laptop. Disconnect any USB devices, external monitors, network cables, and audio cables. Remove any media card or USB drive if inserted. - Remove SIM card (if your configuration has one)
If your Precision 3590 includes a SIM card, carefully remove it to avoid damage during disassembly. - Discharge static electricity
Touch a grounded metal surface before handling internal parts, or wear an anti-static wrist strap.
Once these steps are complete, you are ready to put the laptop into Dell Service Mode, which safely cuts power from the motherboard before you disconnect the battery.
5. How to enter Dell Service Mode safely
Service Mode is a Dell feature designed to cut off power without physically disconnecting the battery cable first. This is an important safety step before you begin any internal service on the Precision 3590.
- Make sure your laptop is completely shut down and the AC adapter is disconnected.
- Press and hold the B key on the keyboard.
- While holding the B key, press the power button and keep both pressed for about 3 seconds, or until the Dell logo appears on the screen.
- Release the keys and press any key when prompted to continue.
- If you see a message asking you to disconnect the power adapter, make sure the adapter is unplugged, then press any key again to proceed.
- When a ready-to-proceed message appears, press any key. The computer will emit three short beeps and shut down immediately.
After this, the computer is in Service Mode and safe to open. If you cannot put the laptop into Service Mode (for example, if it will not turn on), you can still continue, but you must be especially careful when disconnecting the battery cable later.
6. Removing the old battery in your Dell Precision 3590
Important: Dell officially recommends that only authorized service technicians perform internal repairs. If you decide to replace the battery yourself, follow the steps carefully and proceed at your own risk.
6.1 Remove the base cover
- Place the laptop upside down on your clean, soft surface so you can see the underside.
- Locate and remove all screws securing the base cover. Some screws may be captive (they remain attached to the cover even when loosened); simply loosen them fully.
- Use a plastic pry tool to gently release the clips around the edges of the base cover. Work slowly along the edges to avoid bending the plastic.
- Lift the base cover off and set it aside in a safe place.
6.2 Locate and disconnect the battery
Once the base cover is removed, you will see the internal components of the Precision 3590. The battery is a flat, rectangular pack that spans most of the width of the chassis.

- Disconnect the battery cable from the motherboard
Locate the battery cable connector (often labeled BATT1) on the system board. Carefully unplug the cable by pulling on the connector, not on the wires. If you already disconnected it earlier, verify it is fully detached.
6.3 Unscrew and remove the battery
- Locate the five captive screws (M2x4) securing the battery to the palm-rest assembly.
- Loosen all five screws. Because they are captive, they will remain attached to the battery even when fully loosened.
- Hold the battery at the edges and gently lift it away from the palm-rest assembly. Take care not to snag any cables.
- Flip the battery over and carefully peel off any tape that secures the battery cable to the battery body.
- Remove the battery cable from its routing guides on the battery, then disconnect the battery cable from the battery itself.
- Keep the old battery and cable together for recycling, according to your local electronic waste regulations.
At this point, the old battery is removed and you are ready to install the new JTG7N or DR02P battery.
7. Installing the new JTG7N or DR02P battery
Installing the new battery is essentially the reverse of removal, but this is also the moment to double-check that everything is aligned correctly.
- Prepare the new battery
Unpack your new Dell Precision 3590 replacement battery (JTG7N 42Wh or DR02P 54Wh). Compare its shape, screw positions, and connector location with the old battery to confirm compatibility. - Attach the battery cable
If the cable is not already attached to the new battery, connect it to the battery connector, route it through the same guides as the original cable, and secure it with any included tape. - Position the battery
Place the battery into the chassis, aligning the screw holes and edges with the palm-rest assembly. Make sure no cables are trapped underneath. - Tighten the captive screws
Tighten the five M2x4 captive screws evenly. Do not overtighten; a firm but gentle torque is enough. - Reconnect the battery cable to the motherboard
Plug the battery cable connector back into the BATT1 port on the system board, ensuring it is fully seated and straight.
7.1 Reinstall the base cover
- Place the base cover back onto the laptop, aligning the edges and ports.
- Press around the edges to snap all clips back into place.
- Reinstall and tighten all base screws.
- If you removed a SIM card earlier, reinstall it now.
Your new battery is now physically installed.
8. First startup, BIOS check, and battery calibration
After reinstalling the base cover, it’s time for the first startup with the new battery.
- Connect the AC adapter
Plug the charger into the laptop and then into a wall outlet. - Power on the laptop
Press the power button. The Precision 3590 should start normally. If it does not power on, recheck the battery connector and base cover screws. - Check battery detection in BIOS
Enter the BIOS (usually by pressing F2 at startup) and verify that:- The battery is detected.
- The reported battery health is “Good” or similar.
- The battery is charging when the AC adapter is connected.
- Charge the battery fully
Let the battery charge to 100% without interruption the first time. - Optional: Gentle calibration over a few cycles
For the next few days, use the laptop on battery until it reaches about 10–20%, then recharge it up to around 90–100%. Repeating this 2–3 times helps Windows and the battery controller learn the new capacity more accurately.
After this process, your Dell Precision 3590 should enjoy more stable, longer battery life, bringing the laptop back to a comfortable, reliable working condition.
9. FAQ: common questions about Dell Precision 3590 battery replacement
Is it safe to replace the battery myself?
For most careful users, yes. Replacing the internal battery in a Dell Precision 3590 is a moderate-difficulty task: you remove the base cover, disconnect the battery, swap it, and reassemble. If you are not comfortable working with small screws or internal cables, consider using a professional technician.
Will replacing the battery erase my data?
No. Your files are stored on the SSD or hard drive, not in the battery. However, power loss during disassembly could cause data corruption in open files, so always shut down the system and back up important data before you begin.
How long should a new JTG7N or DR02P battery last?
For office and browsing workloads, most users can expect several hours of runtime from a new 42Wh or 54Wh battery, depending on screen brightness and background apps. With good care (avoiding extreme heat, not leaving it at 0% for long), the battery should remain healthy for 2–4 years.
Can I still use my Precision 3590 only on AC power?
Yes, the laptop can usually run from the adapter even with a weak or failed battery, but performance may be affected and sudden losses of power can damage your work. A fresh battery improves safety and mobility.
What should I do with the old battery?
Do not throw the old battery into household waste. Take it to an approved recycling point or electronics store that accepts used laptop batteries. This protects the environment and follows local regulations.
Ready to give your Dell Precision 3590 a new life?
Once you have confirmed that the battery is the cause of your power issues, choosing a high-quality replacement is the fastest way to restore reliable runtime and mobility.
Match the part number on your original battery, follow the guide above, and your Dell Precision 3590 will feel like new again.