If your Dell laptop suddenly won’t hold a charge, shuts down at “30%,” or only works when plugged in,
there’s a strong chance the internal battery is worn out. Two part numbers you’ll see very often in this repair category are
Dell WDX0R and Dell Y3F7Y. They commonly appear across multiple Dell families such as
Inspiron, Latitude, and Vostro.
This guide is written for DIY users replacing their own battery and professional repair shops
looking for a repeatable, low-comeback workflow. You’ll learn how to confirm compatibility, identify real battery failure vs
charger/port problems, replace safely, and maximize the life of the new pack.
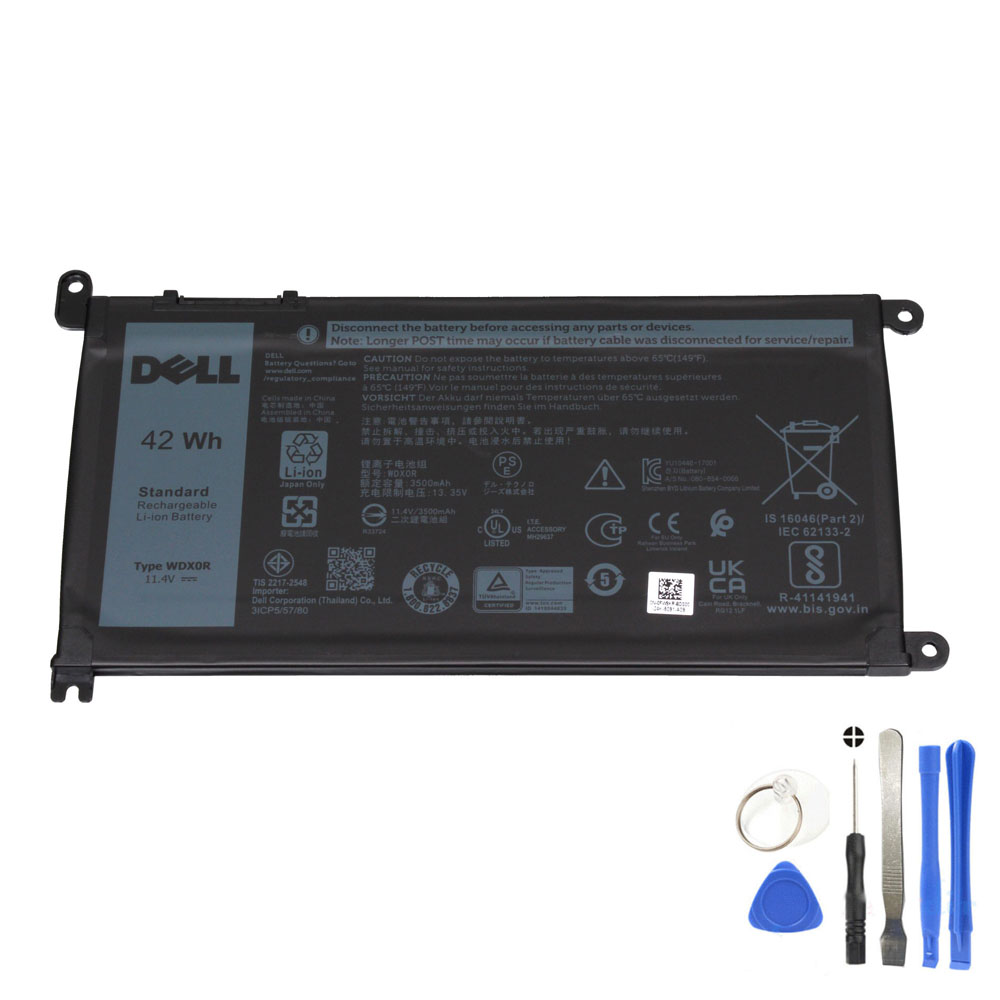
Recommended Replacement: 42Wh Dell WDX0R / Y3F7Y Battery
- Energy: 42 Wh
- Voltage: 11.4V (nominal)
- Cells: 3-cell
- Condition: Brand New
- Package: 1 × Battery for Dell
- Warranty: 12 Months / 30-Day Return
Pro tip: Dell batteries often have multiple equivalent part numbers. If your old battery label shows WDX0R
or Y3F7Y (or the compatible codes listed below), you’re usually in the correct family.
1) What is the Dell WDX0R / Y3F7Y battery?
The Dell WDX0R battery is a common internal battery used across multiple Dell laptop lines.
You may also see Y3F7Y on the battery label or in parts listings—these are typically part-number identifiers
within the same compatibility family for many models.
Key specs (why they matter)
| Specification | Value | What it means |
|---|---|---|
| Energy | 42Wh |
Watt-hours (Wh) is the most honest indicator of “how much energy” the battery can store. More Wh generally means more runtime at the same power draw. |
| Voltage (nominal) | 11.4V | Common for 3-cell “3-series” lithium packs. Voltage must match the laptop’s battery system. |
| Cell count | 3 cells | Thin internal design. (This is not the same as old external 6/9-cell packs.) |
| Capacity (approx.) | ~3,680 mAh (42Wh ÷ 11.4V) | mAh can vary by how the manufacturer reports it; Wh is the better comparison across batteries. |
For most users, the practical point is simple: if your old battery is worn, replacing it with a fresh 42Wh pack restores
stability (no surprise shutdowns) and recovers real runtime.
2) How to tell if your Dell battery is bad (real-world symptoms)
A battery can be “bad” even if Windows still shows 100%. The most common failure patterns are capacity loss,
high internal resistance (causing shutdowns under load), and inaccurate fuel-gauge readings.
Strong signs you should replace the battery
- Very short runtime: your laptop only lasts 15–60 minutes under light use.
- Sudden shutdown at mid-percentage: it powers off at 20–40% remaining.
- Battery percentage drops fast: e.g., 100% → 70% in a few minutes, repeatedly.
- Battery won’t charge properly: stuck at a low % even after long charging (after you’ve ruled out charger issues).
- Swelling / chassis changes: bottom cover bulging, trackpad clicking “wrong,” laptop wobbling on a desk.
Symptoms that can look like battery failure (but aren’t always)
- Slow charging while you’re using the laptop: heavy workloads can consume most adapter power.
- Battery life feels worse after updates: Windows background tasks can raise baseline power draw.
- Charging is intermittent: could be USB-C/adapter/cable/port issues rather than the battery.
Swollen batteries can damage the chassis and internal components.
3) Measure battery health properly (Windows battery report)
If you want a clear, evidence-based answer, use Windows’ built-in battery report. This is useful for both DIY users and repair shops.
Step-by-step
- Open Command Prompt (Administrator recommended).
- Run:
powercfg /batteryreport
Open the generated report and compare:
Design Capacity vs Full Charge Capacity.
The bigger the gap, the more worn the battery is.
Practical thresholds (easy rule of thumb)
- 80–100% of design capacity: generally healthy
- 60–80%: noticeable wear; many users start feeling “short battery life”
- Below 60%: replacement usually delivers the biggest improvement
Important: “100% charged” does not mean “like new.” It only means 100% of the battery’s current maximum.
A worn battery can show 100% and still contain far less energy than when new.
4) Compatibility: part numbers, laptop series, and common pitfalls
The safest way to confirm compatibility is to match your old battery label first. Dell uses many identifiers for the same family,
and listings often include multiple codes.
4.1 Compatible part numbers (partial list)
If your battery label contains WDX0R or Y3F7Y (or any of the related codes), you are typically in the right family.
Examples include:
- Dell 0WDX0R / WDX0R
- Dell 0Y3F7Y / Y3F7Y
- Dell 03CRH3 / 3CRH3
- Dell 08YPRW / 8YPRW
- Dell 0C4HCW / C4HCW
- Dell 0CYMGM / CYMGM
- Dell 0FC92N / FC92N
- Dell 0FW8KR / FW8KR
- Dell 0T2JX4 / T2JX4
- Dell 1RH5X
- Dell PT3W4
- Dell 451-BBVN / 451-BCBS / 451-BCRD
- Dell P26T / P26T001 / P26T002 / P26T003 / P26T004
4.2 Compatible laptop model series (examples)
This battery family is commonly used in Dell Inspiron, Latitude, and Vostro models.
Examples include:
Inspiron
- Inspiron 13 (5368 / 5378 / 5379 / 7368 / 7375 / 7378)
- Inspiron 14 (3481 / 3482 / 3493 / 5480 / 5482 / 5485 / 7460 / 7472)
- Inspiron 15 (3580 / 3583 / 5565 / 5567 / 5568 / 5570 / 5575 / 5578 / 5579 / 5580 / 5583 / 5584 / 7560 / 7569 / 7570 / 7572 / 7573 / 7579 / 7580)
- Inspiron 17 (3780 / 3781 / 5765 / 5767 / 5770)
Latitude
- Latitude 11 (3180 / 3189 / 3190) and Latitude 11 2-in-1 (3190)
- Latitude 13 (3300 / 3379 / 3390)
- Latitude 14 (3400 / 3480 / 3490)
- Latitude 15 (3500 / 3580 / 3590)
Vostro
- Vostro 14 (5471 / 5481) and Vostro 14 3468
- Vostro 15 (3581 / 3582 / 3583 / 5568 / 5581)
Always confirm by matching your old battery part number first, then double-check the laptop model.
5) Not charging? Battery issue or charger/port/motherboard issue?
“Not charging” is one of the most common complaints, and it’s not always the battery. Use this sequence to avoid misdiagnosis.
Step 1: Rule out the adapter/cable first
- Test with a known-good Dell-compatible charger of the correct wattage.
- If your model charges via USB-C, test with a known-good USB-C PD charger and a laptop-rated cable.
- If charging is intermittent, try another power outlet (yes, it matters more often than people think).
Step 2: Inspect the charging port
- Does the plug feel loose?
- Does charging only work at certain angles?
- Is there visible debris or damage?
If port contact is unstable, replacing the battery won’t fix the root cause.
Step 3: Check BIOS/firmware behavior
- Some Dell systems report adapter status in BIOS and may limit charging if the adapter is not recognized.
- Firmware updates can improve charging stability on some models.
Step 4: Determine if the battery itself is refusing charge
If the laptop runs fine on AC power but the battery remains stuck at a very low % across multiple known-good chargers,
the battery may be worn or internally protected (BMS lockout behavior can happen on failing packs).
6) DIY replacement steps (safe workflow)
You will typically remove the bottom cover and disconnect the battery cable.
If you’re not comfortable opening a laptop, ask a professional repair shop.
6.1 Tools you’ll typically need
- Small Phillips screwdriver
- Plastic pry tool (to lift the bottom cover safely)
- Optional: ESD strap (recommended for repair shops)
6.2 Step-by-step (general Dell Inspiron/Latitude/Vostro internal battery workflow)
- Shut down the laptop completely (avoid sleep mode).
- Unplug the charger and all peripherals.
- Press and hold the power button for 10–15 seconds (power drain) after unplugging.
- Remove the bottom cover screws and carefully lift the bottom cover using a pry tool.
- Disconnect the battery connector from the motherboard first (critical safety step).
- Remove the screws holding the battery in place.
- Lift the old battery out gently (do not bend it).
- Install the new battery in the same position and secure the screws.
- Reconnect the battery cable to the motherboard.
- Reinstall the bottom cover and screws.
- Plug in the charger and power on.
6.3 What to look for during installation (helps prevent issues)
- Connector alignment: the battery connector should seat evenly (never force it).
- Cable routing: match the original routing to avoid pinching when closing the cover.
- Screw lengths: keep screws organized—mixing lengths can damage the chassis or motherboard.
42Wh Dell WDX0R / Y3F7Y Battery (11.4V, 3-Cell)
7) After installation: first charge, calibration, and verification
7.1 First charge (best practice)
- Plug in and charge normally to near full.
- Let Windows run for 10–20 minutes; initial battery estimates can be inaccurate at first boot.
- Use the laptop normally for a day or two; the remaining-time estimate usually stabilizes after a few cycles.
7.2 Do you need calibration?
Not usually. Calibration helps when the percentage gauge is inaccurate (jumping or shutting down early).
If everything looks stable after replacement, you can skip calibration.
7.3 Quick verification checklist
- Battery is detected in Windows and shows charging/discharging normally.
- No unexpected shutdowns on battery during light usage.
- Charging is stable (no frequent connect/disconnect behavior).
- Battery percentage drops smoothly rather than in sudden chunks.
7.4 If the new battery is “not charging”
- Power off, unplug, and hold the power button for 15 seconds.
- Open the bottom cover and re-seat the battery connector (a slightly loose connector can cause issues).
- Test with a known-good adapter (and cable, for USB-C models).
- Check BIOS for any battery/adapter status messages.
8) How to make the new battery last longer
Battery lifespan is heavily influenced by heat and charging habits. If you want the new battery to last,
focus on these high-impact habits:
8.1 Control heat (the #1 battery killer)
- Use the laptop on hard surfaces during charging (avoid blankets/sofas that block airflow).
- Keep vents clean—dust raises internal temperature.
- Avoid sustained heavy workloads while charging if cooling is restricted.
8.2 Avoid living at 100% all day (when possible)
- If your Dell provides a charging profile or charge limit setting, consider using it when you stay plugged in most of the day.
- For long-term storage, store around 50–60% charge when possible.
8.3 Simple runtime wins
- Reduce brightness slightly (often the biggest real-world change).
- Close unnecessary browser tabs and background apps.
- Use Balanced mode for better “performance per watt.”
9) Repair shop checklist (fast diagnosis + fewer comebacks)
9.1 Intake questions (high signal)
- Does it shut down at a specific battery percentage?
- Does it run normally on AC power?
- Is charging stable or intermittent?
- Any signs of swelling or chassis deformation?
- Was the charger replaced recently (wrong wattage or damaged cable)?
9.2 Fast workflow
- Visual inspection: swelling, port damage, screw damage.
- Battery report: design vs full charge capacity.
- Known-good adapter test: confirm the charging chain.
- Post-install verification: stable charge/discharge behavior + no shutdown under moderate load.
9.3 Documentation that reduces returns
- Photo of the original battery label (part number + Wh + voltage).
- Battery report snapshot (before replacement).
- Notes on adapter used during test (model/wattage).
FAQ
Is Dell Y3F7Y the same as Dell WDX0R?
They are commonly listed within the same compatibility family for this 42Wh battery type. The safest approach is to match
your old battery label part number (WDX0R / Y3F7Y and related codes) before ordering.
My laptop shows 100% but only lasts an hour. Why?
“100%” only means 100% of the battery’s current maximum. If the battery has aged, its maximum energy is lower than when new.
Check design capacity vs full charge capacity using a Windows battery report.
Do I need to fully drain the new battery to calibrate it?
Not usually. Use it normally. Only consider calibration if the percentage behaves abnormally (jumping, stuck, early shutdown).
Will a new battery fix “not charging” problems?
Sometimes. But “not charging” can also be caused by the adapter, cable (USB-C models), charging port, or motherboard charging circuit.
Always test with a known-good charger and inspect the port first.
Where can I buy a replacement WDX0R / Y3F7Y battery?
You can find it here:
42Wh Dell WDX0R Battery