This guide walks you through a safe, step-by-step battery swap on the Latitude 5410. We’ll cover tools, safety prep, the exact disassembly sequence, and reassembly + calibration. Important fit note: the 68Wh (4-cell) battery extends into the 2.5″ HDD bay. If your laptop still has a mechanical hard drive installed, choose a 42Wh or 51Wh battery—or migrate to an M.2 SSD and remove the 2.5″ drive before installing 68Wh.
Shop Dell Latitude 5410 Batteries (42/51/68Wh)
Tell us your storage setup (M.2-only or 2.5″ HDD) and we’ll confirm the right fit before shipping
Before you start (safety & tools)
- Power down Windows completely. Unplug the AC adapter and all peripherals.
- ESD safety: Work on a clean, static-safe surface. Ground yourself or use an anti-static strap.
- Flea-power drain (optional): After shutdown, hold the power button for ~10–15 seconds.
- Tools: Phillips screwdriver (for captive screws), plastic scribe/opening pick, small parts tray.
Fit reminder: 42/51Wh (3-cell) fit alongside a 2.5″ HDD. The 68Wh (4-cell) occupies the 2.5″ bay; use only with M.2-only systems (no 2.5″ drive/caddy installed).
Step 1 — Remove the microSD card
Prerequisites: Follow the procedure in “Before working inside your computer”.
- Push the microSD card to release it from the computer.
- Slide the microSD card out of the slot and set it aside.
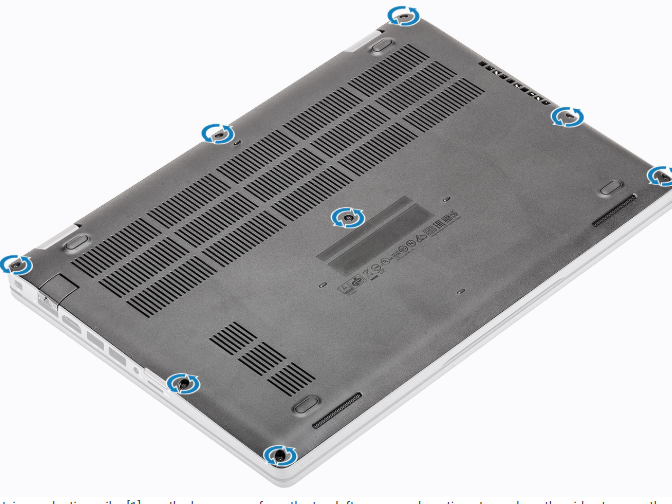
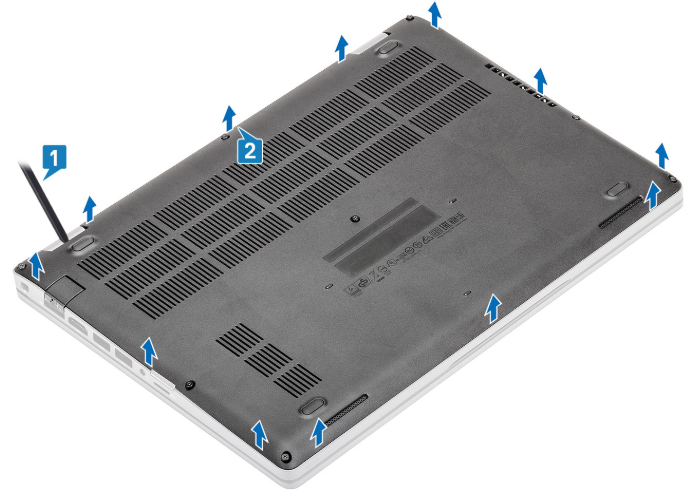
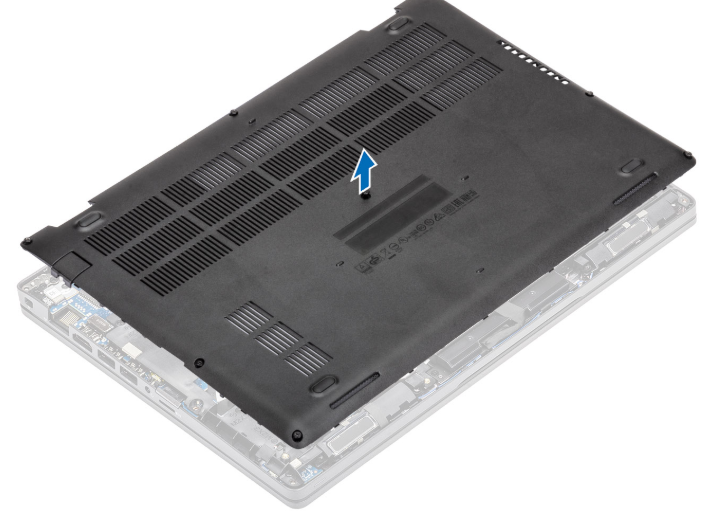
Step 2 — Remove the base cover
Prerequisites: Safety steps above, and microSD card removed.
- Loosen the eight captive screws that secure the base cover to the computer.
- Using a plastic scribe, pry the base cover from the top-left corner and continue along the sides to release the clips.
- Lift and remove the base cover away from the computer.
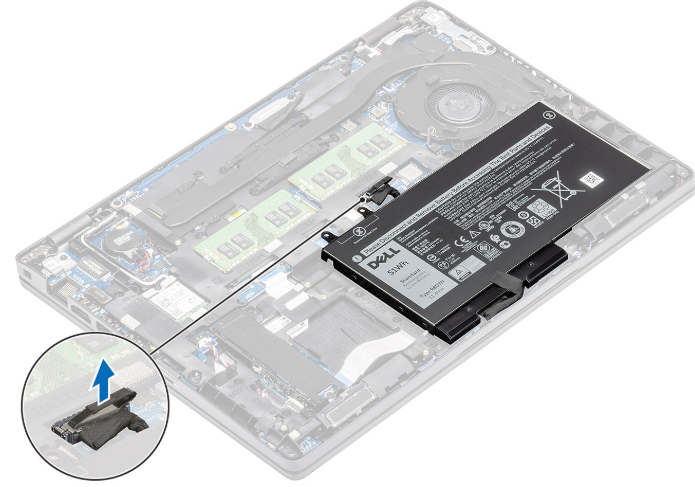
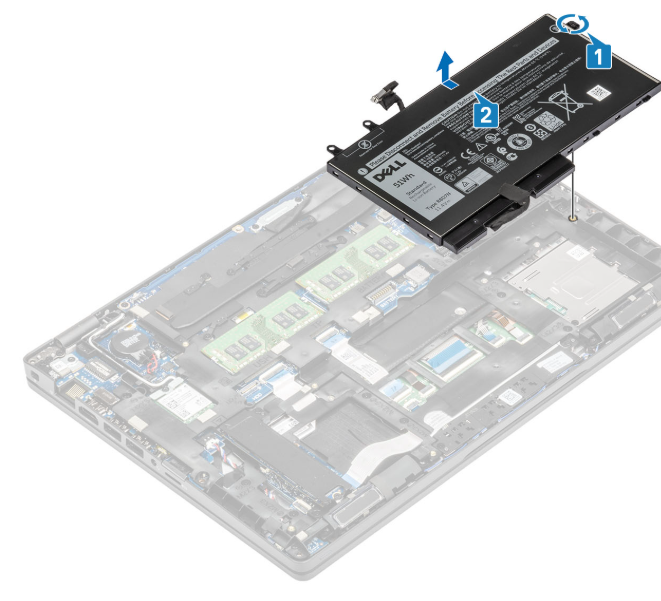
Step 3 — Remove the battery
Prerequisites: Safety steps, microSD removed, and base cover removed.
- Disconnect the battery cable from the connector on the system board.
- Loosen the single captive screw that secures the battery to the palm-rest assembly.
- Lift and slide the battery away from the palm-rest assembly.
- Remove the battery from the computer.
Install the new battery
- Position the new battery in the bay. Make sure the cable orientation matches the board connector.
- Slide it into place, seat it flat, and tighten the captive screw to spec (snug, not overtightened).
- Reconnect the battery cable firmly and evenly.
If upgrading to 68Wh: Verify your system is M.2-only (no 2.5″ HDD or caddy installed). The 68Wh (4-cell) occupies the 2.5″ bay; it will interfere with a mechanical HDD. For HDD systems, use 42/51Wh—or migrate to M.2 first.
Reassemble and validate
- Reinstall the base cover: align clips, press around the edges, then tighten the eight captive screws in a cross pattern.
- Reinsert the microSD card (if used).
- First boot & checks: Power on and tap F2 to enter BIOS. Confirm Battery is detected and AC Adapter Type shows the correct wattage.
- Calibrate once: In Windows, charge to 100% uninterrupted, then discharge to ~10–20%, and charge back to 100% to re-teach the fuel gauge.
Care tips for longer battery life
- Keep vents clear; avoid heat build-up. High temperature accelerates wear.
- When docked all day, consider a charge cap (e.g., 60–80%) in Dell Power Manager to slow aging.
- If the system shows “plugged in, not charging” at ~80%, a charge limit may be active by design—disable it before travel.
Recycling
Do not bin old lithium-ion packs. Recycle the removed battery through a certified e-waste program.
Shop Dell Latitude 5410 Batteries (42/51/68Wh)
Unsure about 68Wh fit? Tell us if your 5410 still has a 2.5″ HDD—we’ll confirm the correct option before shipping